


Reference Centre, Computer Tutorials
Getting Started with Personal Ancestral File (PAF)
 Double click on the icon on your desktop to open the program. My icon happens to be against a portion of my wallpaper that has a black background. Your icon may be resting over a different colour but the clip art image of a small family unit will be identical as will the title below the icon "PAF 5".
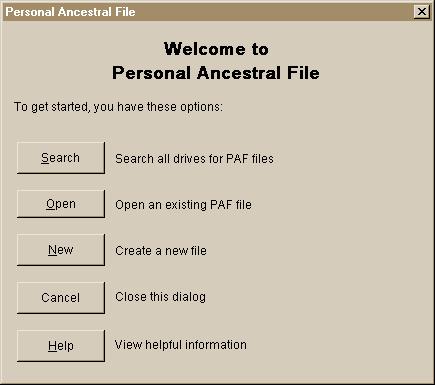
The first time you use PAF a screen will appear that asks you what type of function you would like to do with the program (see the image immediately below this paragraph): open an existing file, create a new file, import a GEDCOM file and so on.
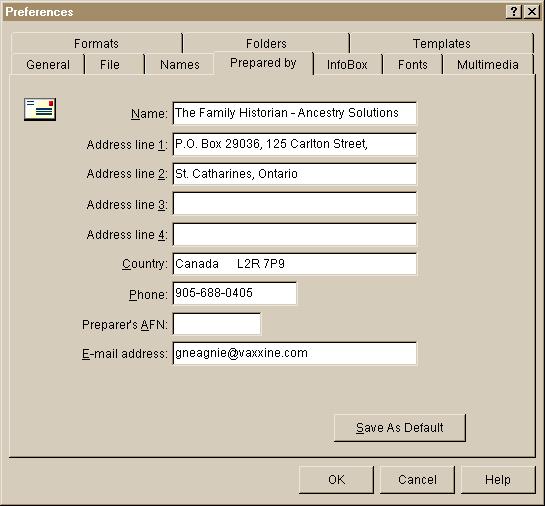
Choose "New" to Create a New File. You will then see the screen that is shown in picture #3, below. This is your program "Preferences" screen. Fill in your name, address, and email address. Click on "OK" at the bottom of the window. Just above the "OK" option you will see a bar that reads "Save as Default". If you think that you will be creating a number of PAF files click on that button to store your name, address and contact details within the program as the default set-up data. Each time you thereafter create a new PAF file this preferences screen will already be pre-filled with the stored data. You can, of course, change any of the data in this screen at any time in any manner.
Main Data Entry Window
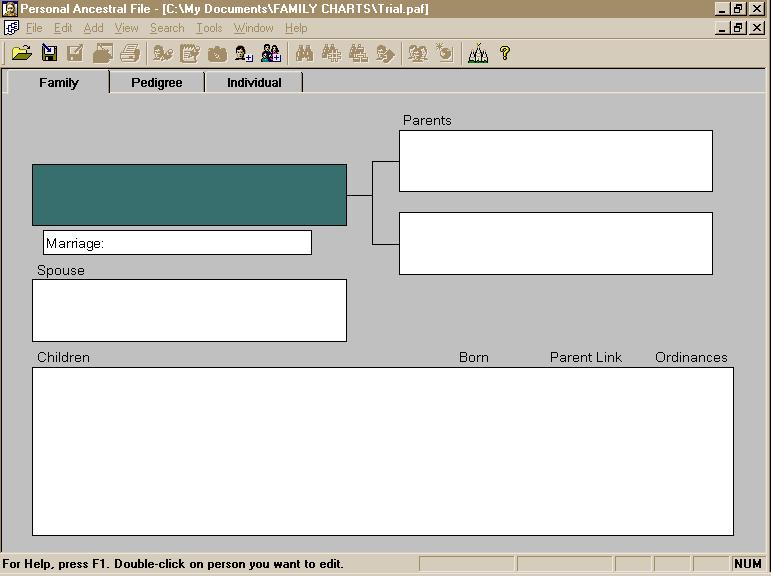
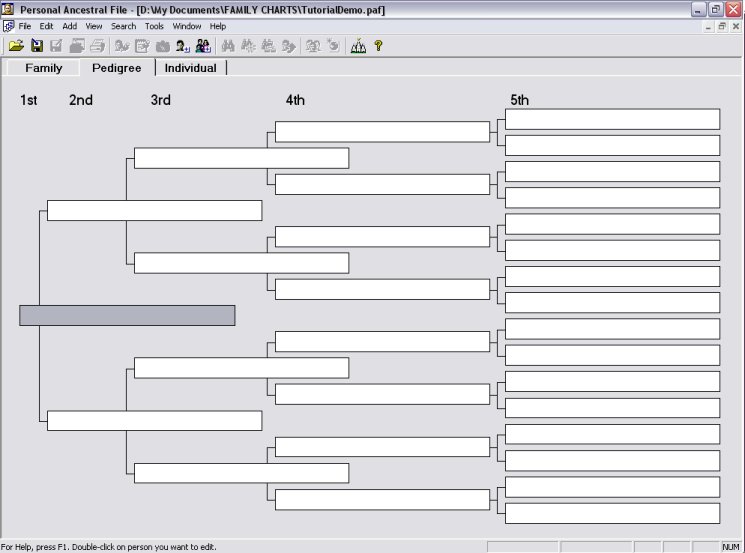
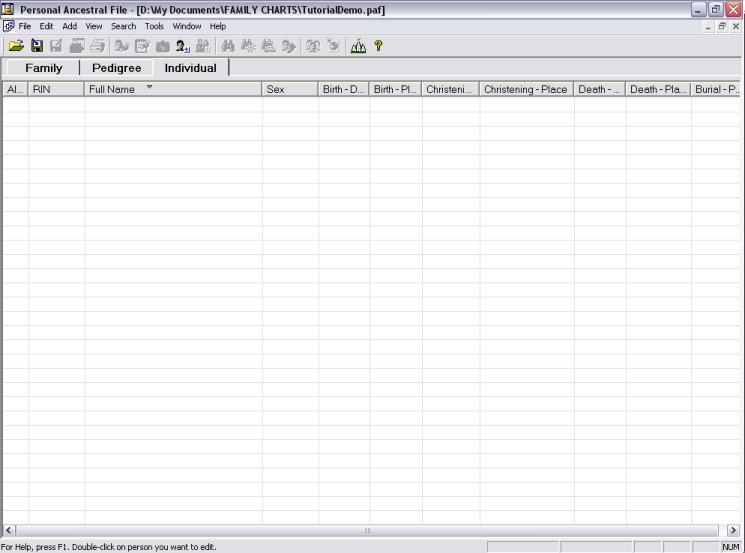
The next screen that will appear will be the main data entry area. Notice across the top of the grey portion of your screen that there are 3 file tabs. You will be in the "Family" view. If you click on the "Pedigree" view you will see that, once you have family information entered this view will show you a pedigree chart of your ancestors. The "Individual" tab, once clicked on, displays the information that you have entered but as an alphabetical list by surname. I have not found this last tab view particularly helpful other than to use as a guide-at-a-glance to what data is still missing from critical ancestor's data.
Family View Window
Pedigree View Window
Alphabetical List by Surname Window
Learning the PAF Program Options
Before starting to enter any data become familiar with the options that are listed under each of the menu items at the very top of your computer screen.
File: contains the options for handling your genealogy files such as New, Open, Close, Save As, Import, Export, Export for Temple Ready, Add Temple Ready Update (the Temple Ready options you will likely never use), Properties, Backup, Restore, Check/Repair, Delete, Print Reports, Exit.
Edit: contains options for changing or amending already entered data in the following categories: individual, notes, multimedia, unlink individual, delete individual, marriage, parents, parent's marriage, order spouses, order children (in these instances the word "order" simply means to arrange those individuals in order of appearance in the family), source list, repository list, individual event list, marriage event list.
Add: NB. This is the function that you will use continuously. On every occasion that a new individual has to be added to your family you will start the addition, first, by clicking on Add and then, second, by choosing the applicable individual from the list. The options are: Individual, Family, Spouse, Child, Father, Mother, Other Parents.
View: Simply provides you the opportunity of changing what is displayed on the computer screen. The options are: Family, Pedigree, Individual (these three are the same as the file tabs at the top of the gray portion of your screen), Toolbar, Status Bar. These last two items should each have a checkmark beside them. The toolbar is the bar at the top of your computer screen which is immediately below the menu items - it has all of the icons or pictures that represent the same functions as are found on the menu items. The status bar is the extra bar that displays at the bottom of your computer screen immediately above the task bar in which your computer's "Start" menu and time are displayed. The status bar will provide you with very basic instructions on what to do.
Search: Allows you to search through your data along the following lines: Individual List, Marriage List, Descendancy List, Find by RIN/MRIN, Advanced Focus/Filter, Home Person (this is always the first person that was entered into a new file and in your case should be you), On Family Search Internet (you will have to be connected to the Internet to use this function and once you click on it you will taken to the familysearch.org website).
Tools: These options allow you to manipulate your data and also has a few interesting features. This is also where you can access your preferences for the size of your display windows and fonts, or change your address or telephone number should the need ever arise.
The options under the Tools menu are: Match/Merge (this is used if you discover that you have inadvertantly entered the same people more than once), Merge Duplicate Sources and Citations (this is used if you discover that you have inadvertantly entered the same type of source reference more than once), Global Search and Replace (used if you find that you have misspelled a surname or place name and you wish to change all occurrences of that word at one time), Change Names to Mixed Case, Create Web Page, Notepad, Relationship Calculator (calculates the relationship that exists between two individuals), Date Calculator (can be used to calculate a person's birth date when only the date of death and age at death are known), Soundex Calculator (used mostly for American research in census records whereby all surnames have been indexed by a numerical code rather than by an alphabetical order), Family Search Internet Genealogy Service (used only if you upload your data to familysearch.org), PAF Companion, Resource File Viewer (these last two are separate programs that you would buy if you wished to use their features. For your purposes, at this time, you will not require either of these programs), Preferences (here you can change the size of your screen displays and fonts, change your name or address, change the manner in which dates and places are displayed on screen and on your printed reports and change the amount of information that is displayed on reports).
Window: The options under this menu item you will likely never use. Clicking on Cascade makes your main data entry window much smaller. The other two options make very little difference in the on screen display. The options here would be handy if you had more than one data file open at a time.
Help: Here you will find help in using the PAF program by way of the following options: Current Topic (used to get instant help on something that you have highlighted with your cursor), Help Topics (see picture #) this allows you to search for a particular topic of concern, Keyboard (this will tell you of some shortcuts you can use to make data entry quicker), Getting Started Guide (a ten page quick look at the PAF and how to use it), User's Guide (an extensive 198 page manual complete with index to subjects. This guide displays in Adobe pdf format so you will need the Adobe program on your computer in order to read this manual. Most computers come equipped with some form of the Adobe program. If you do not have Adobe, give me a call and I shall get you set up with it.) Lessons (you have to be connected to the internet for this option to work. Once you click on this option you will be directed to the familysearch.org website and into their lessons on how to use PAF.). The remainder of the options under Help you will not be using on a regular basis.
Entering Your Data
Now you are ready to start entering data!
1. The "Individual" view screen is the screen that you should be seeing when you start to enter your data. See step #4 below.
2. The active person is the person who is shown in the box that is coloured. Every action will relate to that person. A good rule of thumb is to keep the active person displayed in the top box on the left-hand side of the screen. In this way when you add a father and mother or child belonging to that person the new information will be correctly attributed by the program to the active person.
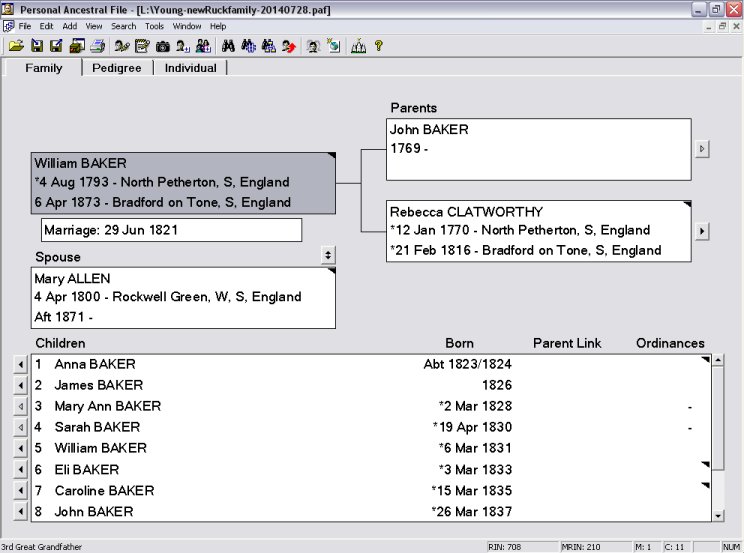
3. What you are looking at on the computer screen: The top box on the left-hand side of the page is used to enter either a child, husband or a wife. Generally speaking, when you first begin a new PAF file you would want to enter the "Primary" individual first. The individual who appears in this box is referred to as the "Primary" individual. The "Primary" individual can be yourself, or if you setting up a PAF file for a friend, that friend would be the "Primary" individual.
The narrow box immediately below is where the marriage date will display after that information has been entered, presuming the "Primary" individual is married at the time that the PAF file is being set up.
The next larger box below is for the spouse of the "Primary" individual.
Once you have both of the spouse boxes filled a double ended arrow button will appear at the right-hand side and immediately above this second box. If you click on the arrow button the person who is shown in this second box will change to the top box.
The large box at the bottom of the screen is where the children for the family will appear once their information has been entered.
The small box at the top right-hand side of the page is for the particulars of the father of the "Primary" individual. The small box immediately below the top box is for the particulars of the mother of the "Primary" individual.
Note on the image immediately below all of the points that have been talked about in numbers 1 through 3, above.
4. All genealogy data entry actually takes place on either an "Individual Entry" or "Marriage Entry" screen.
Move your cursor to highlight the "Primary" individual box (the box on the top left-hand side of the screen). You will not be able to type directly into that box.
Click on the "Add" menu at the top of your computer screen and select the "Individual" option. A new window will open with the "Individual Entry Window".
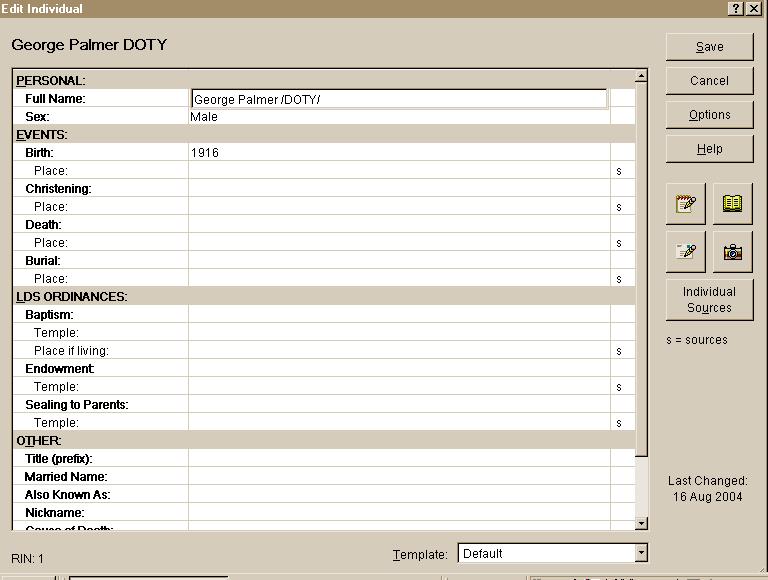
This is the area in which you will enter the "Primary" person's name, select their gender, enter birth, christening, death and burial dates and places. When you have filled in the information that you know click on the "Save" button at the top right-hand corner of the screen. Your information will be retained and you will be returned back to the "Family" view screen. You can edit the individual's information at any time to add, change or delete any information for this particular person by clicking on the "Edit" menu and choosing "Individual". In the meantime, however, the information you type into the "Edit Individual"window will be displayed on the "Family" view screen.
Next you will want to add the spouse of the primary individual you just entered above. Remember to have your primary person in the highlighted box at the top left of your screen. Click on the "Add" menu and select the "Spouse" option. Fill in the "Edit Individual" window just as you did for the primary person and click on the "Save" button in the upper right-hand corner of the screen.
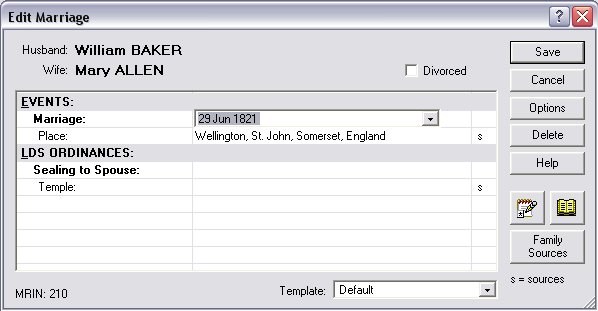
This time, once you click on "Save" a new smaller window will appear called "Edit Marriage" (these words appear in the upper left corner of the new window). Here, you will enter the marriage date and place. Click on the "Save" button in the upper right-hand corner of the new smaller window. When that marriage window closes you will, again, be returned to the "Family" view screen.
The information that you have entered thus far should now be visible. Some information will be hidden from view either because it is not necessary to be displayed on the "Family" view screen or because the entry was too long to display the full text in the box.
Next you should add any children that the "Primary" individual had. Again, click on the "Add" menu and this time select "Child". You will get a small window in the centre of your screen asking you if you want to add a "New Individual" or "Select an Existing Individual".
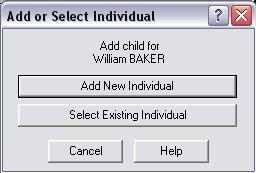
For the most part, you will likely be adding "New Individuals". Click on the "Add New" button. The "Edit Individual" entry screen will again appear. Only this time, you will be adding the information concerning a child of the "Primary" person. When you have entered all the data that you have, click on the "Save" button once again. You will then be asked if you wish to add another child for the "Primary" person at this time. If you do, then click on the "yes" button. If you have no other children to add for the "Primary" person, then simply click on the "No" button.
Next you should add the father of the "Primary" person. Click on the "Add" menu and select the "Father" option. You will then see that small window again that asks you whether you wish to "Add New Individual" or "Select Existing Individual". Again, for the most part, you will likely be adding a new individual. However, click on the choice that reflects your current information. If you choose "Add New Individual", once again the individual entry screen will appear where you can add the details concerning the father of the primary person. Remember to click on the "Save" button. You will then be given the "Edit Marriage" entry screen once again where you can enter the details of the marriage of the father. Click on "Save". If you do not have the marriage details, click on "Save" anyway. In that way you will be able to go back at a later date and "Edit" the marriage to enter the data. Clicking "Save" on a blank marriage entry screen holds the position of that marriage in your program with an appropriate MRIN number. It is not necessary to "Save" the marriage if you have no information at the time you enter a person. PAF is very forgiving and you can return at any time to edit marriage information.
Lastly, you will be adding the details of the mother of the "Primary" person. Again, click on the "Add" menu and choose the "Mother" option. Once again, you will be asked if you wish to "Add New Individual" or "Select Existing Individual". Once you have selected the "Add New" option, you will be taken to the individual entry screen. Once you have entered the data that you have - sometime that data may be as sparse as knowing only the given name of an ancestor or ancestress - click on the "Save" button.
Your "Family" view screen - if you have followed all of the above steps - should now contain a small arrow button to the left of each child shown in the "Children" box. There should also be an arrow button to the right of the "Primary" person's father and mother. In order to move the father, mother or a child of the "Primary" person to the "Primary" box position, click on the arrow next to that individual's name. You will then be able to repeat the steps in order to add the parents or additional children for the new "Primary" person.
The key to remember is that, before you type in any information always click on the "Add" menu and select a person - father, mother, spouse, or child. While you are learning to use this program do not use the "Add Family" function.
In closing this preliminary lesson on using PAF, please be aware that even though the first or "Primary" person box is highlighted as soon as you open the PAF program you cannot enter any data directly into that box that will be saved unless you have first selected the "Individual" option from the "Add" menu.
Print this Page